Begin the installation process by running the installation program. You must be logged in as Administrator or with an account that has Administrator privileges. On operating system's with User Account Control (UAC), such as Windows Vista, you will be prompted to have the installation program run with elevated privileges - you must allow this for a successful installation.
BrowserHawk uses Windows Installer 2.0 technology to help ensure clean installation and uninstallation operations. If you do not have version 2.0 or higher of Windows Installer on the machine(s) you are installing BrowserHawk on, you can obtain it as a free download from the Microsoft web site.
Note: BrowserHawk supports manual deployment. Although using the installation program is highly recommended over manual deployment, you may find manual deployment your only option if you are using a hosting provided and have limited control of the web server. See http://www.cyscape.com/support/kb/XcIBViewItem.asp?id=74 for more information.
When you run the installation program you will first be presented an introduction screen and the BrowserHawk End User License Agreement (EULA). If you accept the terms, select the "I accept" option to continue. Upon continuing you will be presented with a series of screens. The following section provides a walk-through of the BrowserHawk installation.
Use this screen to select the target directory into which the BrowserHawk software will be installed. If the directory name does not exist it will be created for you. It is recommended that you keep the default installation location of \Program Files\cyScape\BrowserHawk. It is also recommended that you install BrowserHawk on your local hard drive and not over a shared network drive or location.
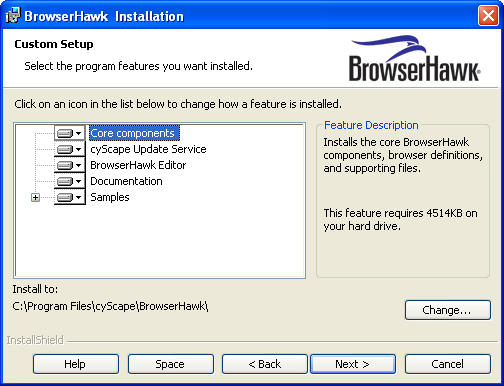
On this next screen you can customize which features of the product are installed, and specify the target installation directory. All features except for the "core components" are optional.
The feature installs the BrowserHawk ActiveX and native .NET components, along with the browser definition data file and supporting files. This feature is required.
BrowserHawk can monitor cyScape on an ongoing basis for released updates to the browser definition files. Once an update it detected, it will automatically download and install the update for you! It can even email you a notice informing you of the update it has performed along with a list of what the update contains. Upon this automatic installation, the new browser definitions take effect immediately without any administration or steps required on your part.
Note: This feature requires the Professional or Enterprise Edition of BrowserHawk, as well as an active Support and Maintenance plan (this plan comes with your BrowserHawk purchased and can be renewed yearly). This feature also requires that you have the .NET 2.0 or higher framework installed.
The BrowserHawk Editor provides important functions which are particularly useful as you develop with BrowserHawk. Installation of the Editor is therefore highly recommended on development machines, particularly if you will be using the BrowserHawk Reports Web Service. Generally speaking we also recommend that you install the Editor on production machines, as it can come in handy from time to time.
In order to determine whether installing the Editor is right for you, the following is an overview of the main functions that the Editor provides:
Viewing and/or customizing the browser definition file (Master BDF). The browser definition file (BDF) contains definitions that are used by the BrowserHawk component. Unlike older components that use text based .ini files for browser definitions, BrowserHawk uses a high performance, binary object-based data file (think of it as its own proprietary, special purpose database). As such you cannot read or update this file directly. Instead you use the BrowserHawk Editor, which provides an easy to use GUI environment for viewing and customizing the definitions.
Setting DashCache, BrowserHawk Reports, and various other options and parameters. The BrowserHawk Editor serves as a control panel of sorts for the BrowserHawk component. The Editor allows you to easily configure DashCache and the BrowserHawk Reports Web Service (BRWS), as well as auto-generates the code for you to log to your database using BRWS. Without the Editor installed the only way to enable and set these options is through manual entries to the system registry.
License key management: BrowserHawk requires a license key in order to function. The Editor therefore provides a function for importing your license key can validating it is valid. If you do not install the Editor, then the installation program itself will prompt you for the license key, but in this case the key is not validated until the component is run for the first time.
By default the BrowserHawk documentation is installed. If you do not want the documentation installed de-select this option.
BrowserHawk includes a number of sample ASP and ASP.NET scripts that will help you get up to speed very quickly. With this option, a virtual web site is created for you off your default web site, and the samples are installed to its location. Installation of the Samples is generally recommended on production machines as well, as these samples can prove useful for testing and troubleshooting purposes. You can always later remove the samples by rerunning the installation program, choosing Modify, and de-selecting this option which will remove the virtual web site and all samples for you.
The installation program will confirm that it is ready to begin installing the BrowserHawk software based on your selections. If you would like to go back and make any changes you can do so at this time. After choosing the Next button on this screen the installation program will begin copying the necessary files to your computer.
Note: After installation you may be prompted to reboot your system. Please do so at that time if prompted to ensure a successful installation. If you cannot do so at that time, do not run the BrowserHawk software until the machine has been rebooted. If you are upgrading BrowserHawk from a previous version, you can stop the IIS Admin service before upgrading to minimize the chances that a reboot will be required.